Stage 2 – Base Tabletop Terrain Squares
Next, lets detail the creation of the Base Tabletop Terrain made up of a number of flat 2 x 2 squares of 6mm MDF.
Most of the squares of MDF I can get my hands on are not perfectly square nor are any of their sides exactly 2 foot long. This leads to many problems when trying to join 8 of them together for a game. Some sides will never fit together well. While some sides are not supposed to go together, ie a river end should always be position next to another river end, not a road or flat edge, it would be nice to be able to move those that can around to create more variations in the terrain. Some may not have this problem as they will certainly be better woodworkers than I. As it is I get my local hardware store to cut these squares for me.

Here is the 8 x 4 table
I glue on 6mm cork tiles that are 1 x 1 foot square. I mark the exact centre of the 2 x 2 section and glue tiles on from that point out. I then trim the edges (the tiles always go a little over the edge of the MDF) to make the whole section a little more square and more to a 2 x 2 width all over. Then I place them all together to confirm their placements and move them around a little to make sure they all go together well and note those edges that can’t work together and can’t be trimmed or adjusted.

Cork tiles glued 4 to a 2 x 2 mdf square section
Now for the modelling. This process I call the Overall Flocking Tutorial and is the same process used for all stages in this project associated with terrain.

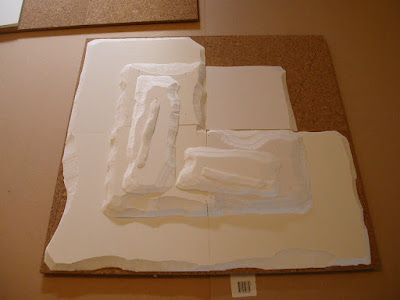
Lay out the contour pieces to check positions and sizing.

Angle the edges to ease the look of the contours and glue.
1. Use putty or clay to model any small relief for the square. It does not hurt to add a small rise here and there only 1mm or 2mm high to break up the flatness of the square.

2. Paint the squares with a thick layer of base earth brown. Use this as the filler to close any gaps between the tiles and cracks in clay or marks on the tiles.
3. While the paint is still wet, thrown down your flocking mix. Start with larger pieces and then fill the area with a thick layer of fine flock. I use a small grade cravel 1 in small sections in 3 to 4 places around the square. Then I add the larger pieces that naturally occur in even the finest grade flock. Then I fill about half of the rest of the board with 2 different colours of fine grade flock using different colours in different sections about the size of the palm of a hand randomly around the board.
Finally I fill all remaining areas with a mixture of 50:50 of the same 2 colours of fine flock.


4. Allow time to dry and then shake off the excess flock. You can try shaking the excess off in between each colour being added to keep the colours separated as long as you can but I find that when you shake them all off, if you have used each colour equally, you will naturally have a new supply of the mixed flock ready for application to the next square.

5. Once fully dry, spray the square a number of times with spray on glue or hairspray or sealant or varnish – whichever you use. I tend to use hairspray at the moment so I coat it with a thick coat 2 or 3 times. Allow time to dry in between each coat. Watch for any warping and if it occurs, place an upside down saucer underneath the square in the centre and place a number of equal weighted items in each corner on top. Not too heavy as you don’t want it to bend in the other direction.

Euro Terrain Project - Part 1 - Part 2 - Part 3 - Part 4

No comments:
Post a Comment