
The cork tiles he brought out were so much better made than the hobby ones I got from the local hardware store. At Bunnings, a pack of 6 cost around $15AUD and were all different sizes. They are supposed to be 300 x 300 but some are 301 x 297 or 300 x 298 or 304 x 301 and so make it really hard to get a good 8 x 4 table out of them.
The cork tiles I was looking at were left overs and from what I could tell were all pretty much the same size and cut. They also had a layer of dry glue or paste on one size for gripping and were all perfectly the same thickness and strength. I was impressed. Suddenly my ideas of a multitude of 300 x 300 terrain squares all stored away in an archive box and layed out when needed to whatever configuration I wanted, came flooding back to me. I played around with the tiles for about 30 minutes on the floor of the carpet showroom. All the tiles would be doubled up with glue which would allow for cuts in the terrain for rivers and creeks and depressions. Some of these doubled tiles would cut in half and used as hills and contours.
Coupled with a layer of green paint and fine flock sifted through my new sifter and I should see a nice flat, accurately set playing area onto which I can add my scenic items of hills, fields, woods, roads and built up areas.
I bought 18 of them. Enough to make a sample area of 3 x 3. Cost me $50AUD, that's less than $3AUD each. I would be back.
So here is a repear of Step 3 of the project using Cork Tiles instead of gym mats. The problem with the gym mats is they are way too big to work with. It takes ages to paint, then flock, then seal them and then you can only store them standing against a wall somewhere. And being as thick and hard as they are, it would be hard going trying to cut them for a hill or gouge them for a river.
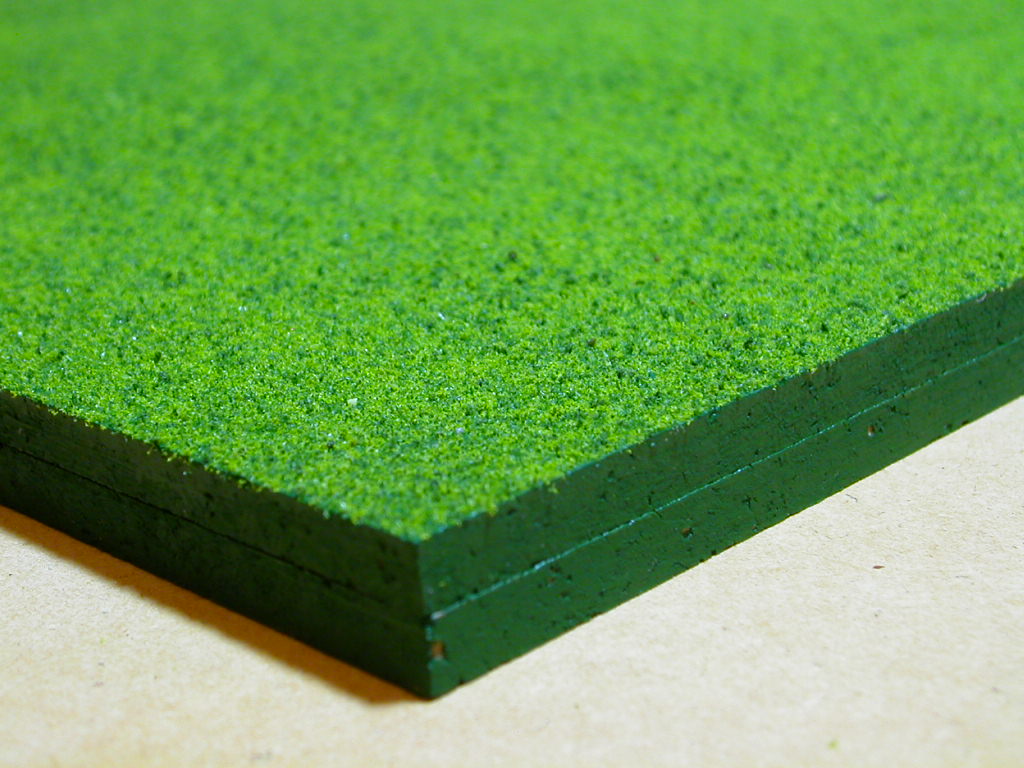
Here are the pile of cork tiles I purchased.

I then sorted them out so I have the 9 largest separated from the 9 smallest. Hard to tell as they are all so close in size. This is so 1 x large tile can be glued on top of 1 x small tile. The large will then define the footprint on the table while the small just fulfills the 2nd layer rule so all tiles are 2 x tiles thick.
These sets of tiles are then glued to each other resulting in 9 x double thickness tile sections.

Mid Green paint is then applied to all 9.


Once the paint is dry, a thick layer of pva or wood glue is applied.
While the glue is still wet, swamp the tile with fine flock sifted through a fine sifter. Again I have used a 50:50 combination of lite and dark green flock from Heki. Wait a few minutes and then gently stand the tiles upright for all the excess flock to fall off onto paper to be used again. I tried waiting 24hrs with the gym mats but the problem was that the moisture in the air, being in Queensland in Australia saw most of the excess flock "adhere" to the board up to a few milimetres thick. It would not come off with any knocking or shaking but would come off if I ran my finger lightly over it. This would be a nightmare to try and seal successfully and would be a waste of flock. As long as the glue is thick and the flock is applied thick, then you will get enough coverage after a few minutes of drying time to then shake off the excess.
Leave these tiles for 24 hrs for the glue to dry.

Seal the tiles. I use a good Matt Sealer from a professional art supply shop. It is important that all the flock stays on even when leaning on the tiles or moving troops around on them. You don't want to pack up the tiles and find tonnes of flock all over the table or floor when finished a game. And you don't want a year later to see "balding" spots on the tiles. So use as many layers of sealant as is required but let each layer dry completely before testing and applying another.
9 Cork Terrain Tiles are now complete.
Now to move on to Part 4 - Rivers
5 comments:
Sounds like you two guys should exchange hints and tips... :o))
http://philbancients.blogspot.com/2010/11/flat-hills-and-cunning-plan.html
Trying something similar - but for modular 'flat' hills (shamelessly copied from another website).
http://philbancients.blogspot.com/2010/11/flat-hills-and-cunning-plan.html
Those tiles you mention are too small. I need an 8 x 4 table which would take about 576 tiles being that I double layer them! And that source is in the US.
My local guy charges $2.75AUD per tile which is 30x30 and perfectly cut and square. Previously I tried tiles in packs of 6 from hardware store for about $11AUD. Some weren't even square!
You get what you pay for.
I'm have been thinking of doing the same thing. Was going to use MDF but cork seems to be better option because it's seems easier to use and is much lighter. I went to Bunnings today and picked up a 6 pack to muck around with - cost about AUD13. I have a couple of questions - does the cork warp after painting? and is it necessary to double layer the tiles? - the one I have are about 6mm thick. Great Blog BTW.
Yeah I tried mdf as well but could never get the sections all cut perfectly square and all the same size.
You will have problems with those cork tiles from Bunnings. You will find some are smaller than others and even not so square.
To be more sure, get them from Andersons Carpets at Coorparoo. I think the guy's name was Shaun.
Or do a ring around to the flooring places.
Thanks for the comments on the blog.
Post a Comment