
It’s been a while since I progressed on the terrain side of things.
With all the painting over the past few months, I have not had a chance to do much on the terrain side of things. I built a small bench that fits under my gaming table and pulled out all my terrain boxes of bits and pieces and junk kept for future projects. Most I threw out but the rest I organised into office archive boxes and neat placed them on my new bench. The beauty of this bench is that it’s exactly 4” high which allows my robot carpet cleaner to move around the room freely doing its cleaning thing without bumping into scores of boxes and bits and pieces.
So now it all organised, I can dedicate a little more time back on the job. All the time painting recently has not meant terrain was not on my mind. I pondered and noted and jotted and researched and finally settled on a system not too far from my previous posts.
My Wargaming Terrain System
1. My new 8 x 4 fold away table. See earlier post here.
2. 8 section boards measuring 2 x 2 made of 6mm mdf with 1 layer of 1 x 1 cork tiles and then painted and flock flat. These sections could have gaps cut in the layer of cork for modelled rivers, creeks and rough terrain.
3. Scenic Models of hills, fields, farms, woods, rough ground, ridgelines, roads, villages and village sections. Each of these will be a stand alone model and will be based on a square or rectangle section of 3mm mdf or 3mm plasticard with bevelled edges.
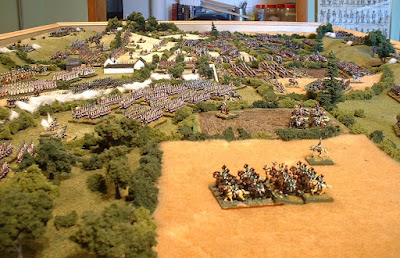
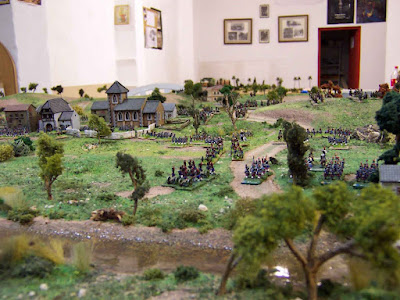
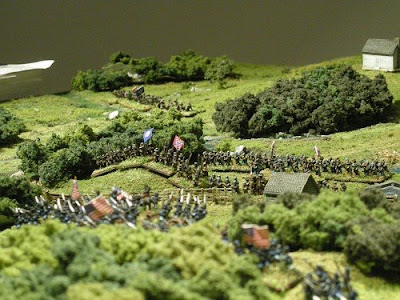
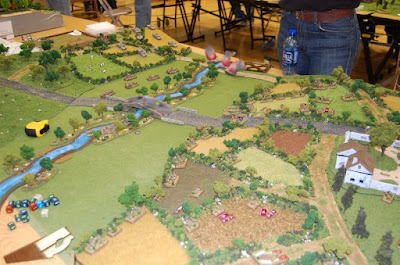
Here's a couple of inspiration shots:
Here's how it will work
I will place 8 sections down to form the base of the table top.
Next I will place numerous scenic models on the tabletop. I will place down as many of these as I can, keeping in mind they will designed to butt up against each other to result in a continual “scene”. So potentially, every square inch will have one of these models located on it. Any gaps will naturally be open area and if small enough can be filled with individual bases of trees or overgrown bush or rock sections. This will result in any problems in the lines between the base terrain squares being hidden and lots more detail over which to fight.
To help hide any remaining lines and gaps between the models, I will place loose lichen and hedges and fencing as used in this photo:
So stay tuned and join as a follower on the menu on the left as I take on yet another, and hopefully final, terrain building ride.
With all the painting over the past few months, I have not had a chance to do much on the terrain side of things. I built a small bench that fits under my gaming table and pulled out all my terrain boxes of bits and pieces and junk kept for future projects. Most I threw out but the rest I organised into office archive boxes and neat placed them on my new bench. The beauty of this bench is that it’s exactly 4” high which allows my robot carpet cleaner to move around the room freely doing its cleaning thing without bumping into scores of boxes and bits and pieces.
So now it all organised, I can dedicate a little more time back on the job. All the time painting recently has not meant terrain was not on my mind. I pondered and noted and jotted and researched and finally settled on a system not too far from my previous posts.
My Wargaming Terrain System
1. My new 8 x 4 fold away table. See earlier post here.
2. 8 section boards measuring 2 x 2 made of 6mm mdf with 1 layer of 1 x 1 cork tiles and then painted and flock flat. These sections could have gaps cut in the layer of cork for modelled rivers, creeks and rough terrain.
3. Scenic Models of hills, fields, farms, woods, rough ground, ridgelines, roads, villages and village sections. Each of these will be a stand alone model and will be based on a square or rectangle section of 3mm mdf or 3mm plasticard with bevelled edges.
Here's a couple of inspiration shots:


Here's how it will work
I will place 8 sections down to form the base of the table top.
Next I will place numerous scenic models on the tabletop. I will place down as many of these as I can, keeping in mind they will designed to butt up against each other to result in a continual “scene”. So potentially, every square inch will have one of these models located on it. Any gaps will naturally be open area and if small enough can be filled with individual bases of trees or overgrown bush or rock sections. This will result in any problems in the lines between the base terrain squares being hidden and lots more detail over which to fight.

To help hide any remaining lines and gaps between the models, I will place loose lichen and hedges and fencing as used in this photo:

So stay tuned and join as a follower on the menu on the left as I take on yet another, and hopefully final, terrain building ride.
1 comment:
Very inspiring. The terrain section with the river looks great.
John
Post a Comment